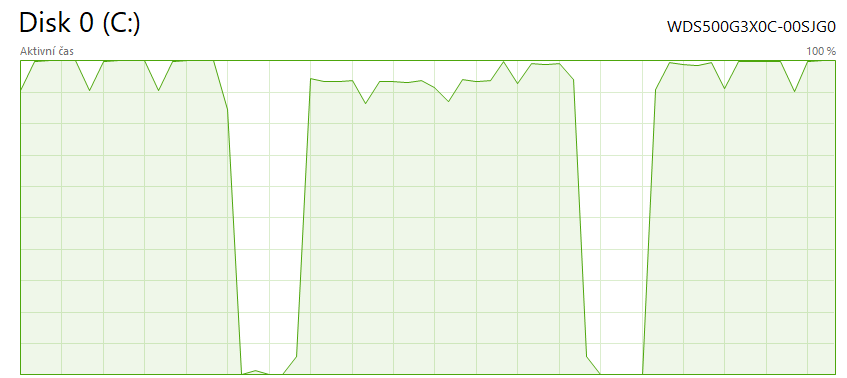
You bought a modern PC, a shiny new NVMe SSD sits inside, and Microsoft promised Windows 11 would fly like a rocket. But the reality hits different. System boot takes minutes, applications open hesitantly, and in Task Manager, the "Disk" tab occasionally panics, glowing red at 100%. Where is the problem?
The answer often hides in incorrect software configuration and ingrained myths left over from the era of spinning hard drives. Here are the five main mistakes that unknowingly bottleneck your Windows 11 performance.
1. Defragmenting a Modern SSD (Huge Mistake!)
In the days of old HDDs, compiling scattered data (= defragmentation) was essential maintenance to sustain speed. But if you hit the "Defragment" button on a flash-based SSD drive, you achieve nothing but needlessly burning through its lifespan.
An SSD contains no mechanical reading head that must physically jump across a platter. Fetching data from one end of the chip to the other takes an electronic microsecond, regardless of how fragmented it is stored. Stop shifting the data around; you're only artificially creating millions of pointless writes (TBW).
2. Having the TRIM Feature Disabled
When you delete a file in Windows and empty the trash, the system doesn't actually wipe it from the drive. It merely marks that space as "free to be overwritten." This poses a massive problem for an SSD because to reuse that spot later, it must laboriously erase it block by block beforehand, which slows the entire operation to a crawl.
The TRIM feature acts as a janitor—during quiet background moments, it bypasses the system and physically clears that deleted junk so the cells are immediately 100% ready for a lightning-fast write.
How to Verify TRIM is Running:
- Click the Windows icon and type cmd (Command Prompt). Open it as Administrator.
- Type exactly this command:
fsutil behavior query DisableDeleteNotify - If the result shows DisableDeleteNotify = 0, you're good and TRIM is active! If it shows "1," enter the command by replacing "=" with "0" to enable it and hit Enter.
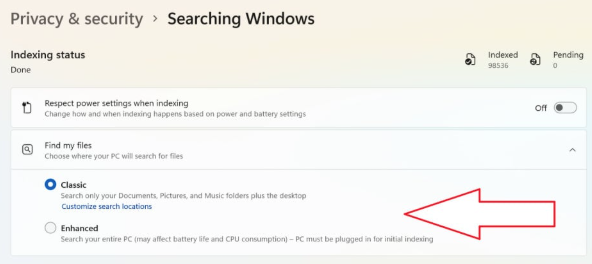
3. Indexing Everything Everywhere
Windows 11 features a built-in "librarian" that constantly scours every corner of the drive, creating an inventory word by word (so the search magnifier on your taskbar works instantly). However, for older, slower systems, this is computational and disk suicide, and the primary culprit behind the "100% Disk Usage" issue.
Navigate to Search settings and restrict Indexing exclusively to critical folders (Documents, Desktop). It makes zero sense for the librarian to comb through a 200GB installed Cyberpunk directory twenty times a week.
4. Startup Hell and Background Services
Launch Task Manager right now (Ctrl + Shift + Esc), click over to the "Startup" tab, and take a close look at the truth. Do you really need Skype, the Epic Games launcher, three different RGB control panels, an HP printer client, and Spotify to fire up within seconds every single time Windows boots?
Each of these programs demands a piece of memory and sends its own aggressive query to the SSD storage space upon opening. Right-click the vast majority of these unnecessary background apps and boldly select Disable.
5. The Biggest Performance Killer: A Completely Full Drive
We've already broken down Wear Leveling technology in detail within an earlier massive article. As we mentioned: An SSD needs room to breathe. The moment free space drops below the critical 15% threshold, the internal processor (disk controller) loses room to maneuver and repackage data, causing speeds to rocket collapse to a fifth of their potential. The only fix is a brutal purge of the Downloads folder or using a tool to wipe old Windows Update remnants. Read the full details right here!
Summary
Windows 11 is packed with spectacular technology, provided you don't get in its way. Stop treating a cutting-edge semiconductor SSD like a vintage vinyl record (no hard defragmentation, no pointless continuous indexing of gigabyte installation packages). Leave a staging area empty in the corner, tame the applications trying to shove themselves into your startup taskbar, and don't forget to enable the magician known as TRIM. The speed will return instantly on its own.